
How to use ASocks proxy in AdsPower
Take a Quick Look
Master the art of online anonymity with our guide to integrating ASocks proxies in AdsPower. Unlock unlimited residential proxies and enhance your digital privacy today!
ASocks is one of the fastest-rising names in the world of proxy service providers. We offer unlimited fast residential proxies for our users. The list of over 150 countries and the cheapest tariff across board without a dump down on quality or compromise in security. Asocks offers:
- best price on the market – 3$ а 1Gb
- pay as you go (only for traffic that you used)
- only residential and mobile proxy
- ultra-fast speed and worldwide coverage
- unlimited threads and no blocks
- easy to register and use within AdsPower
Just register now at ASocks.com and use code "AdsPower" during registration. And you will get your first 3Gb to test the quality. To use ASocks Proxy in AdsPower you simply need to login into your ASocks account. Select a Proxy that you would like to use and copy all the details
(If you still don’t have an account at ASocks then you need to register first. And don’t forget to use promo-code “AdsPower” to get your bonus of 3Gb).
Then go to AdsPower, click New Profile and go to the Proxy section. If you choose Proxy Settings as Custom then do the following steps. In Proxy type set HTTPS or SOCKS5 Proxy. Then paste all the details of your selected Proxy from ASocks: Address, Por, Login and Password. You can check the Proxy before starting. Click the OK button if everything is set.
Also you can set your proxy and save it in Proxy Manager. Just go to the Proxies, click on the button Add Proxy. And then add your proxy in allowed formats. Check the proxy and click the button OK. Not when you will create a New Profile you can choose Saved Proxies.
You can find detailed description of these two steps below.
1. Creating a Proxy Server Address in ASocks
Open the ASocks web-page and enter your account using a sign in form. If you do not have an account on ASocks, create one and use it for entering the service. Press the Get started button.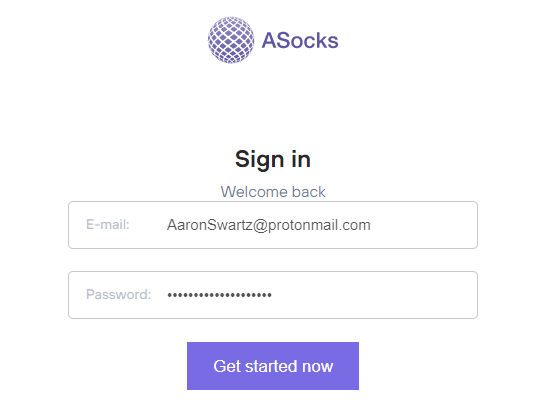
Note: the HTTP and Socks5H protocols are supported.
Once you have entered your account, check the balance. It should be positive to get a connection. However, for a stable and reliable connection please view your tariff plan, rates and conditions.
If required, refill the balance by clicking the Balance and plan tab on the left-side menu, press the Top up button and follow the instructions. 
Go to the My proxies tab on the left-side menu and click it. The corresponding window should open. Choose the preferred country, and optionally you may select the state and city from the drop-down lists. ASN is an optional parameter as well, and is used by the advanced users for receiving a proxy from the preferred autonomous system.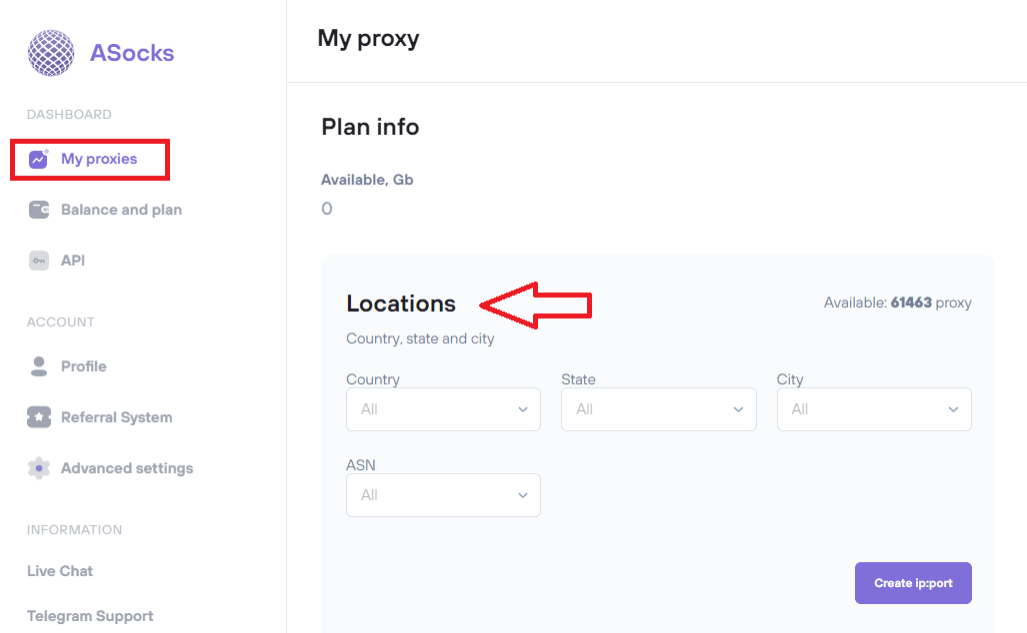
Scroll down the page and expand the Proxy settings tab by clicking the arrow sign. The two options should expand:
Keep proxy (default option) - the option is used when the proxy server operates until the connection is lost due to the death of the proxy server and/or IP-address. In case of disconnection, the system should automatically restore the connection, but it usually takes time.
Keep connection - the option provides immediate reconnection which is almost invisible for a user in case of connection loss and/or a proxy server death. The system automatically replaces the dead proxy server with an alive one by choosing it from the list of available proxies.
A user can choose any of the options. For the advanced users having a high demand in a stable connection, the keep connection option is recommended.
Choose the Authorization method by clicking the arrow sign and expanding all available options.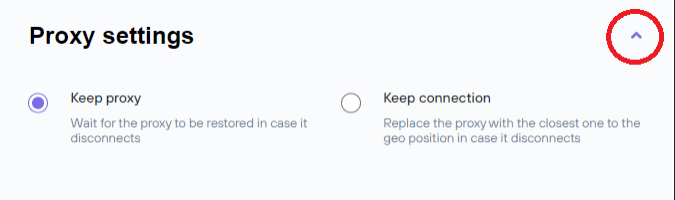
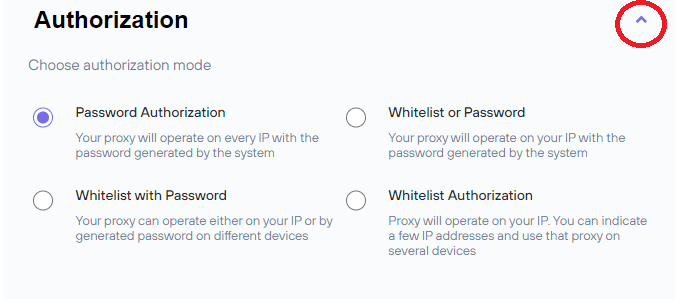
Password authorization (default option) - this option allows a user’s authorization on any IP-address by using the generated password.
Whitelist with password - the option requires addition of a user’s IP-address into ASocks whitelist, and it allows connection to a proxy server by using the generated password.
Whitelist or password - the option requires addition of a user’s IP-address into ASocks whitelist, and it allows choosing the connection method: either by whitelist or by the generated password
Whitelist authorization - the option requires addition of a user’s IP-address into ASocks whitelist, and the authorization is performed by entering the generated password into the browser settings.
Note: to get included into the ASocks whitelist, it is required to save a user’s actual IP-address on the ASocks service settings. Click the IP Whitelist icon located in the top right corner of the My proxy page, and the IP Whitelist window should appear.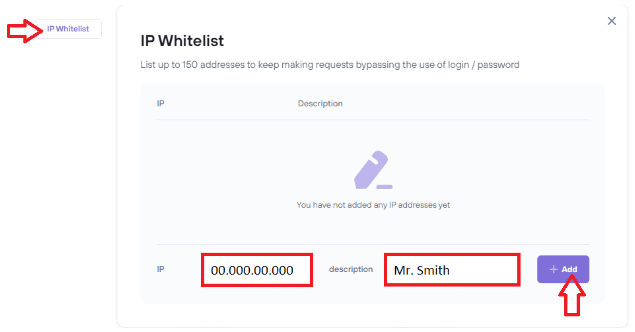
The current IP-address should be automatically displayed in a corresponding box. A user may give a name of the IP-address by completing the description box, but this feature is optional.
(Note: if an IP-address has not been automatically detected by the system, check your public IP via one of the web-services, such as https://www.whatismyip.com, and enter the data into the IP box.)
Press the Add button, so the IP should be automatically included in the ASocks whitelist and displayed in the list.
(Note: maximum five (5) IP-addresses can be registered in the ASocks user’s account.)
Once the user’s IP has appeared in the ASocks whitelist, authorization methods using the Whitelist option is available. A user can choose the most suitable authorization option by clicking it.
Once all the required parameters have been set up, click the Create ip:port button, and the dialog window containing the IP-address and login should open. The proxy password is not available only for the Whitelist Authorization option.
Copy the generated data and enter it into the corresponding boxes (IP-address and IP-port) of the browser settings that you are currently using.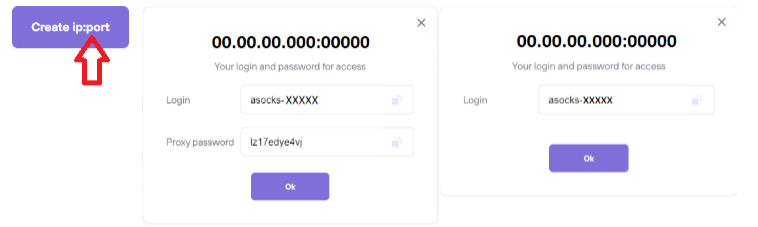
2. Connecting to a Proxy Server in AdsPower
Firstly you need to create a new profile in AdsPower.
Just click New profile and go to the Proxy section. Choose the Proxy settings as Custom and paste all your details of your ASocks proxy. You need to input Address, Port, Login (Proxy Username) and Password (Proxy Password). 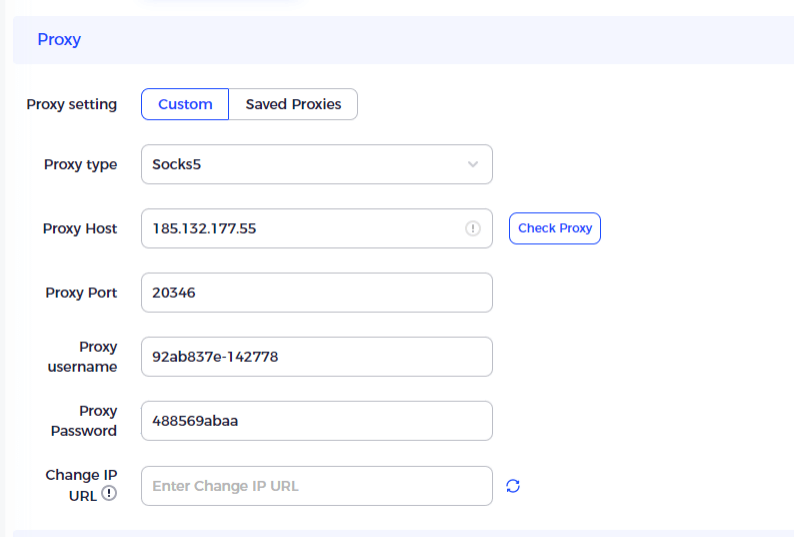
You could first check the proxy and then click the button OK. You are all set.
Also you can set your proxy and save it in Proxy Manager. Just go to the Proxies, click on the button Add Proxy. 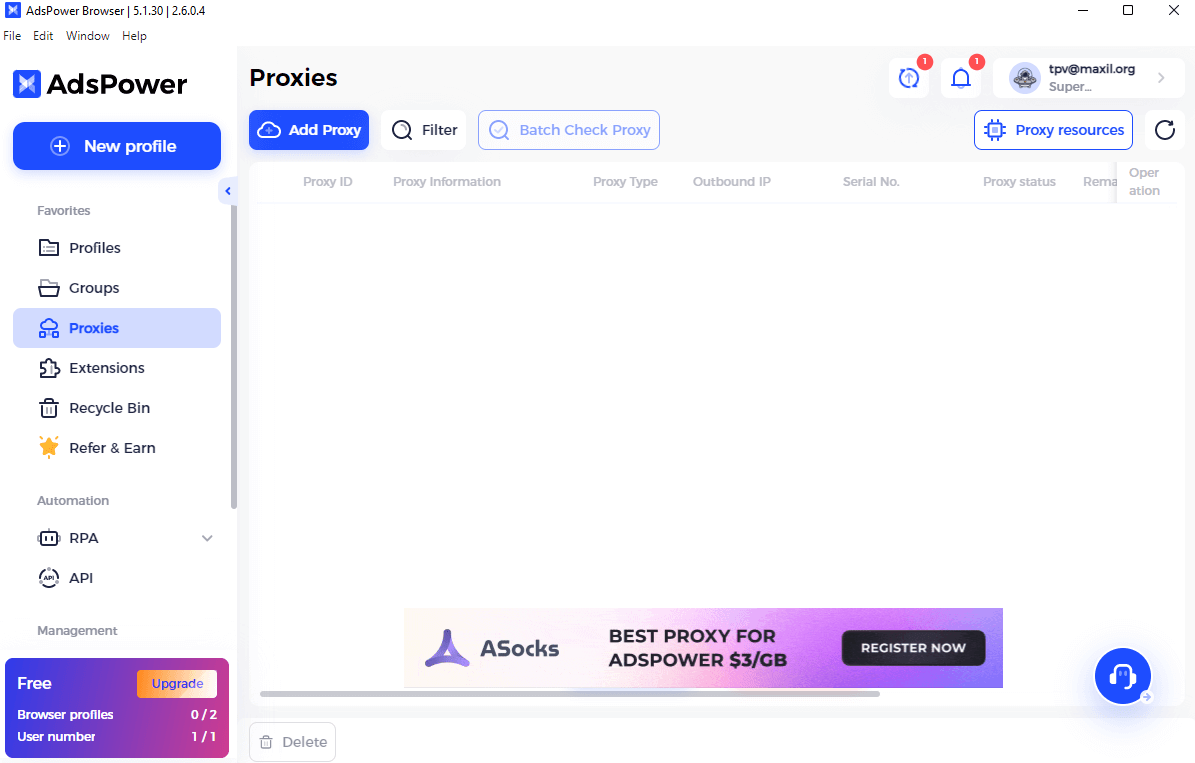
And then add your proxy in allowed formats. Check the proxy and click the button OK. 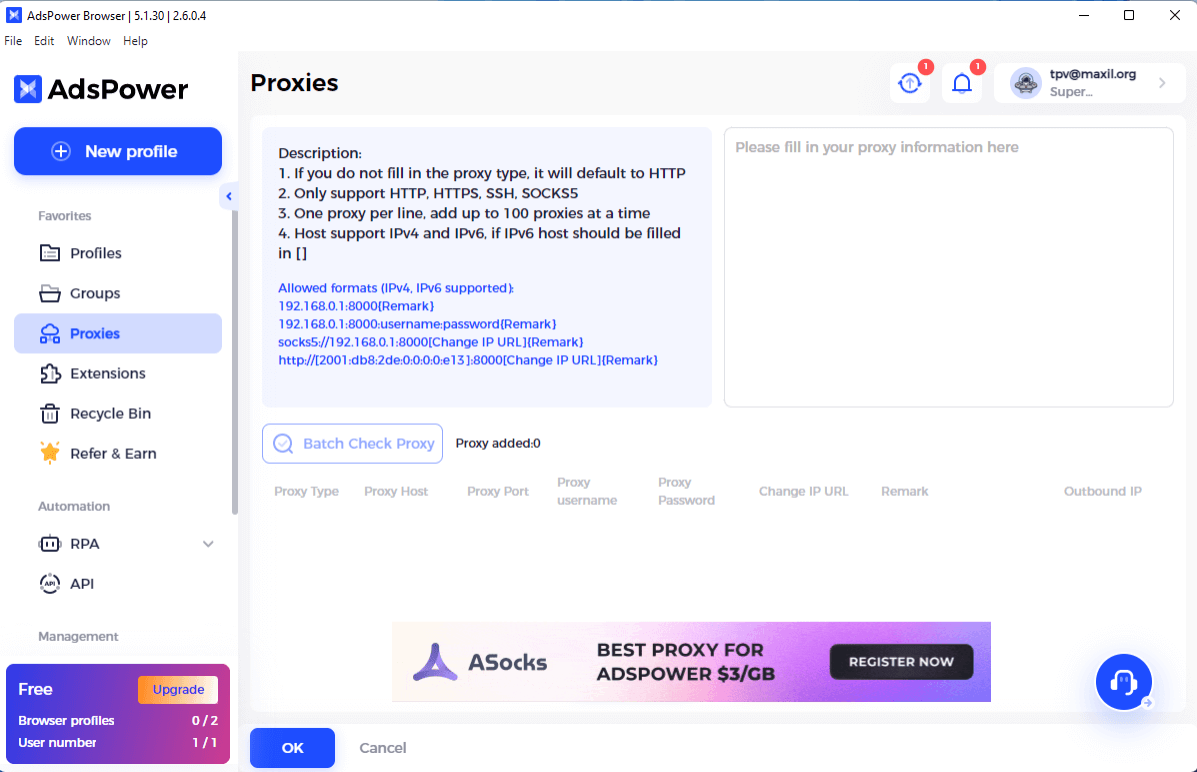
Now, when you will create a New Profile you can choose Saved Proxies. 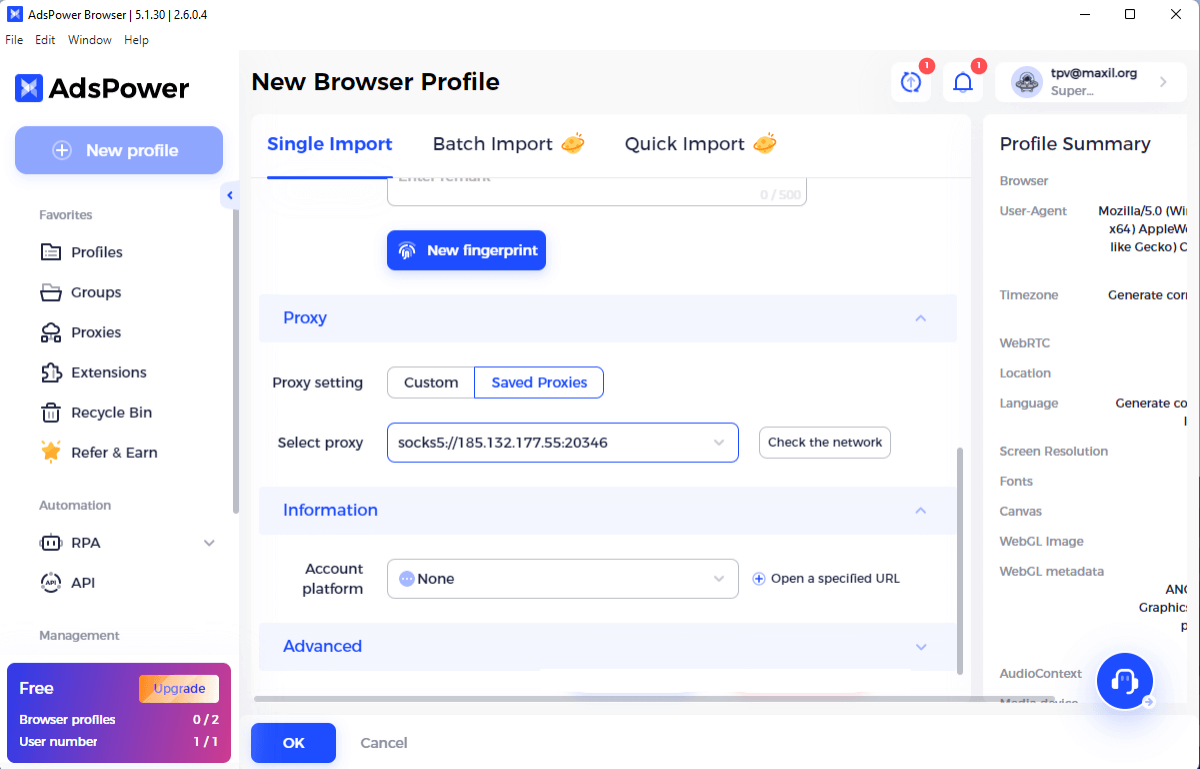

People Also Read
- New to RPA: Re-Execute Tasks, Variable for Prompt, etc. Available | AdsPower

New to RPA: Re-Execute Tasks, Variable for Prompt, etc. Available | AdsPower
Există câteva actualizări noi ale funcției RPA din AdsPower. Urmăriți-ne pentru a explora cum să vă îmbunătățiți procesele RPA pentru a gestiona mai multe conturi și sarcini.
- How to Earn Money by Watching Videos on YouTube | AdsPower

How to Earn Money by Watching Videos on YouTube | AdsPower
Descoperă cum să câștigi bani vizionând videoclipuri pe YouTube și ajută-te să stabilești dacă merită timpul tău.
- 10 Workable Ways to Make Money with YouTube 2024 | AdsPower

10 Workable Ways to Make Money with YouTube 2024 | AdsPower
이 가이드에서는 유튜브 채널 수익 창출을 위한 10가지 전략을 소개하고, 수익 잠재력을 높여주는 도구인 AdsPower를 소개합니다.
- Super Easy-to-Use Residential Proxy Sharing: Quick Start with Cherry Proxy | AdsPower

Super Easy-to-Use Residential Proxy Sharing: Quick Start with Cherry Proxy | AdsPower
360Proxy și AdsPower: Ghid rapid pentru partajarea proxy-ului rezidențial extrem de ușor de utilizat.
- Bulk Check Proxies + Customize Shortcuts: Ease Your Way in AdsPower Browser | AdsPower

Bulk Check Proxies + Customize Shortcuts: Ease Your Way in AdsPower Browser | AdsPower
Pentru a vă spori și mai mult eficiența, AdsPower a continuat să actualizeze unele funcții pentru a facilita gestionarea profilurilor și a proxy-urilor de către utilizatori. Haideți să explorăm.
